Every podcast studio owner eventually has the same moment of clarity: the gear is excellent, the client is talented, and the recording still sounds like it was captured inside a cardboard box. The culprit, almost every time, is the room itself.
Acoustic treatment is one of the most misunderstood investments in the studio world. It gets conflated with soundproofing, dismissed as optional, or approached as a last-minute visual upgrade rather than a core operational decision. That misunderstanding costs studio owners real money: in re-recording sessions, in client complaints, and in the slow erosion of reputation that comes from audio that sounds unprofessional despite expensive equipment.
This guide is the one you would have wanted before your first build. It covers the physics you actually need to know, the practical difference between controlling your room and isolating it, how to diagnose problems before spending anything, and where to put every dollar when you are ready to treat.
Whether you are fitting out your first room or fixing problems in an existing space, the framework here applies. Getting acoustics right is not about spending the most money. It is about understanding what your room is doing to your sound and correcting it deliberately.
Why Acoustics Matter More Than Equipment
A common misstep among new studio owners is investing heavily in microphones, audio interfaces, and mixing desks while neglecting the one thing that those tools cannot compensate for: reflections, flutter echo, and low-frequency buildup from an untreated room.
Sound travels in waves. When a wave hits a hard, parallel surface, it reflects back. When two parallel hard surfaces face each other (think standard drywall construction), the wave bounces back and forth and combines with the original signal. That combination is what you hear as the distinctive hollow, ringy quality of an untreated room recording. No amount of post-processing fully removes it. You can reduce it, but the artefacts remain.
Low-frequency problems are worse. Bass frequencies have long wavelengths and accumulate in room corners, creating what engineers call "standing waves" or "room modes." The result is a recording that sounds artificially boomy in some spots and thin in others, depending on where the microphone and talent are positioned. This inconsistency is the enemy of a reliable, repeatable studio product.
The practical consequence for studio owners is this: a podcast recorded on a mid-range microphone in a well-treated room will always sound better than a recording made on professional-grade equipment in an untreated space. Clients notice even if they cannot articulate why. As covered in the full studio design guide, acoustic treatment decisions belong at the planning stage, not as an afterthought.

Understanding the Difference Between Soundproofing and Acoustic Treatment
These two terms are used interchangeably in most online discussions, and conflating them leads to expensive mistakes.
Soundproofing is about preventing sound from entering or leaving a room. It is a structural and construction discipline. Effective soundproofing requires mass (thick walls, double drywall), decoupling (air gaps, resilient mounts that prevent vibration transmission), and sealing every gap (doors, windows, HVAC penetrations). True soundproofing is expensive, often requires structural changes, and cannot be retrofitted effectively without significant construction work.
Acoustic treatment is about controlling how sound behaves inside the room. It does not stop sound from passing through walls. What it does is reduce unwanted reflections, control decay time (how long a sound rings in the room), and tame low-frequency buildup. This is achieved with absorptive materials (acoustic foam, mineral wool panels, heavy fabric), diffusers (irregular surfaces that scatter rather than reflect), and bass traps (thick absorptive materials placed in corners to catch low frequencies).
For most podcast studios, acoustic treatment is the primary need and the primary lever. Your clients are not recording orchestras, and your neighbours are not your audience. What matters most is the internal quality of the captured audio, and that is entirely within the domain of acoustic treatment. Soundproofing becomes more relevant in dense urban environments, shared buildings, or where clients require total isolation from external ambience.
Understanding this distinction lets you budget correctly. A studio owner who thinks they need soundproofing but actually needs acoustic treatment may spend tens of thousands on construction when a few thousand in well-placed absorption would have solved the problem entirely.
The Core Elements of Acoustic Treatment
There are three categories of treatment, and a well-treated studio uses all three in the right proportions.
Absorption reduces reflections by converting sound energy into heat as it passes through porous material. This is the most visible form of treatment: acoustic panels mounted on walls, ceiling clouds suspended overhead, and thick fabric backdrops. The effectiveness of absorptive material depends on its density and thickness. Thin acoustic foam (25mm or 1 inch) treats high frequencies only. Thicker panels (75mm to 100mm, or 3 to 4 inches) of dense mineral wool or rockwool treat a much broader frequency range, including some mid-bass content. For podcasting specifically, broadband absorption (panels that work across a wide frequency range) is preferable to thin foam tiles, which are primarily cosmetic.
Diffusion scatters sound energy rather than absorbing it. Where absorption reduces the energy of a reflection, diffusion breaks it into smaller waves travelling in multiple directions, reducing the perception of harsh reflections without making the room feel acoustically "dead." Diffusers are typically wooden or MDF constructions with irregular surfaces. They work best in larger rooms and are most effective when placed at the rear of a room, behind the primary listening or recording position.
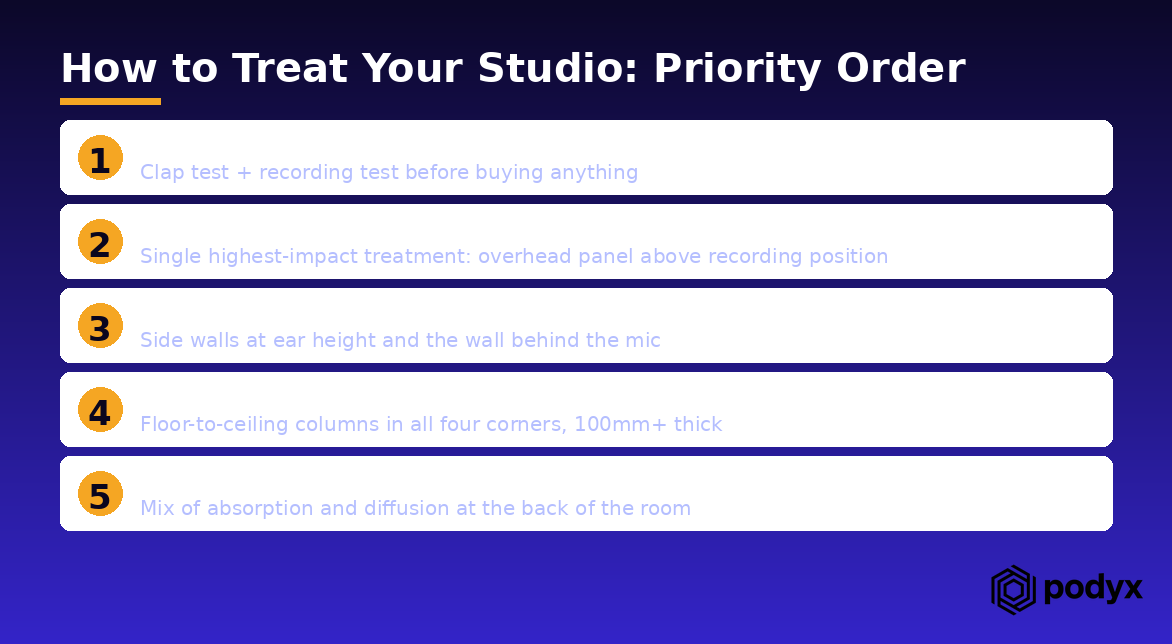
Bass Trapping addresses the low-frequency buildup in corners. Corners are where bass energy accumulates most intensely, so thick absorptive material in floor-to-ceiling corners (and to a lesser degree, wall-to-wall corners) significantly reduces low-frequency mud. Standard acoustic panels do not meaningfully absorb bass; dedicated bass traps must be thick (at least 100mm, preferably 200mm) and are most effective when filling the tri-corner junctions (where two walls meet the ceiling or floor).
A common beginner mistake is to cover every wall in thin foam and wonder why the room still sounds off. The answer is usually that high frequencies are absorbed, but bass buildup and flutter echo from parallel surfaces remain. The fix is almost always to add corner bass traps and replace thin foam with thicker broadband panels at the primary reflection points.

How to Assess Your Room Before You Buy Anything
Spending money without a diagnosis is one of the biggest costs new studio owners face. Acoustic treatment follows the same rule. Before ordering anything, spend an hour assessing what your room actually needs.
The clap test is your first tool. Stand in the centre of the room and clap once, sharply. Listen to what happens. A strong, distinct "flutter" echo (a repeating ping sound that decays) indicates parallel reflective surfaces. A boomy, prolonged low-frequency ring after the clap points to bass buildup. A clean, short decay with no flutter suggests the room is already reasonably controlled.
The recording test goes further. Set up your microphone in the exact position a guest would typically use. Record 30 seconds of silence (no background noise if possible) and then 30 seconds of someone speaking. Listen back on headphones. You are listening for: room reverb (the speaking voice sounds like it is in a space rather than "dry"), flutter echo (repeating artefacts around hard consonants like "t" and "p"), low-frequency mud (words sound thick or boxy), and high-frequency harshness (bright, glassy quality that comes from too many hard, reflective surfaces with no absorbers).
Identify the primary reflection points. These are the spots on your walls and ceiling where sound from the microphone first bounces before reaching the recording. The mirror trick works well: sit in the listening position and have someone hold a mirror flat against the wall. Wherever you can see the microphone in the mirror is a primary reflection point. These should be your first treatment targets.
Take note of your corner situation. Are all four wall-to-wall corners accessible? Are the tri-corners accessible? This determines whether full bass trapping is feasible or whether you need to compromise with corner panels.
Finally, measure your room dimensions. Rooms with dimensions that share common multiples (for example, 3m x 6m) have more severe standing wave problems than rooms with non-parallel dimensions or odd ratios. If your room is a perfect rectangle, expect more bass mode problems and prioritise corner treatment accordingly.
A Room-by-Room Treatment Guide for Podcast Studios
Treatment priorities vary by room type. Here is a practical framework based on the most common studio configurations.
Small recording booths (under 10 sqm / 100 sqft): The priority here is absorption. Small rooms tend to be over-bright from hard surfaces and under-treated for bass. Cover at least 25 to 30 percent of wall surface area with broadband panels (75mm mineral wool, fabric-wrapped). Fill all four floor-to-ceiling corners with bass trap material. Avoid diffusion in small rooms: there is not enough space for it to be effective, and it can create an unpleasant, disorienting sound field. A ceiling cloud (an absorptive panel suspended above the recording position) makes a significant difference in small booths. Aim for a room that feels "dry" when you speak: no noticeable decay or echo.
Mid-size studios (10 to 25 sqm / 100 to 270 sqft): These rooms benefit from a combination of absorption at primary reflection points, corner bass traps, and selective diffusion at the rear. The classic approach is to treat the front of the room (behind and around the microphone position) with absorption and the rear with a combination of diffusion and some absorption. This creates a "live end, dead end" setup that sounds natural without being completely anechoic. Prioritise the side walls at ear height and the ceiling above the recording position.
Converted office or home spaces: These rooms typically have the worst acoustic starting point because they were built for human occupancy, not audio work. False walls, suspended ceilings, carpet, and heavy furniture all help incidentally. Focus first on breaking up parallel surfaces (even repositioning furniture makes a measurable difference), then treat the most reflective surfaces with panels before addressing corners. Temporary treatment options like thick moving blankets, bookcase walls, and fabric partitions can provide a workable interim solution before permanent installation.
The PSO community at Podcast Studio Owners on Skool is an active resource for room-specific advice from other studio operators who have solved exactly these problems.
Budget vs. Premium: Where to Spend and Where to Save
You do not need to spend a lot to treat a room well. But you do need to spend it in the right places.
Spend on: Density of absorptive material. Thick rockwool or mineral wool panels (Rockwool RW3, Owens Corning 703/705, or local equivalent) are dramatically more effective than thin foam. You can build fabric-wrapped panels yourself for $30 to $60 per panel with materials from a hardware store and fabric supplier. A set of six to eight broadband DIY panels and four floor-to-ceiling bass trap columns in the corners will treat most small to mid-size studios for under $500 in materials.
Spend on: Ceiling treatment. This is the single highest-impact surface in most recording rooms because it is the closest flat surface to the recording position and creates significant early reflections. A well-built ceiling cloud over the recording position makes a more audible difference than any other single treatment element.
Save on: Commercial acoustic foam tiles. They are not useless, but their price-to-performance ratio is poor. For the same budget, DIY mineral wool panels cover more surface area and absorb a much broader frequency range. If you want the visual look of foam tiles, use them as decorative supplementation after your broadband treatment is in place.
Save on: Pre-packaged "studio treatment kits." They are almost always optimised for aesthetic photography rather than acoustic effectiveness. Buy materials and build your own or hire a local carpenter to build panel frames.
For a perspective on where acoustics fits within the broader cost structure of a growing studio, the studio business model breakdown covers how to think about capital allocation across equipment, treatment, and operations. Getting acoustic treatment right is a one-time investment that improves every recording you make indefinitely. That return profile is hard to beat.
Common Mistakes That Waste Money and Time
After building and consulting on dozens of podcast studio setups, a few mistakes come up repeatedly.
Treating only the walls. The ceiling is typically the most important surface in a recording room. Many studio owners hang panels on four walls, leave the ceiling bare, and wonder why recordings still sound ambient. Ceiling treatment is the first thing experienced room designers do.
Using thin foam for bass control. Bass frequencies require mass to absorb. A 25mm foam tile does essentially nothing for low frequencies. If your recording sounds boomy or muddy, thin foam will not fix it. You need thick material in the corners.
Treating the whole room evenly. Not every surface needs treatment. Over-treating a room produces a recording environment that sounds uncomfortably "dead" and actually makes mics work harder to capture natural vocal tone. Target your primary reflection points, treat corners, and leave some natural reflectivity in secondary surfaces.
Buying treatment before diagnosing the problem. The clap test and recording test take 15 minutes. Skipping them often results in treating the wrong problems. If your main issue is a specific low-frequency room mode, no amount of wall panels will solve it.
Treating acoustics as a visual exercise. Acoustic panels that are too thin, too small, or placed on non-reflective surfaces are decoration rather than treatment. Every panel you install should be doing acoustic work, not just filling wall space.
Getting acoustic treatment right pays dividends beyond sound quality. It is also part of building a studio pricing strategy that holds: a well-treated room is a premium product, and premium products command premium rates. When clients can hear the difference immediately, pricing conversations become easier.
The One-Line Summary
Acoustic treatment is not an upgrade for established studios. It is the foundation that makes everything else in your studio work.
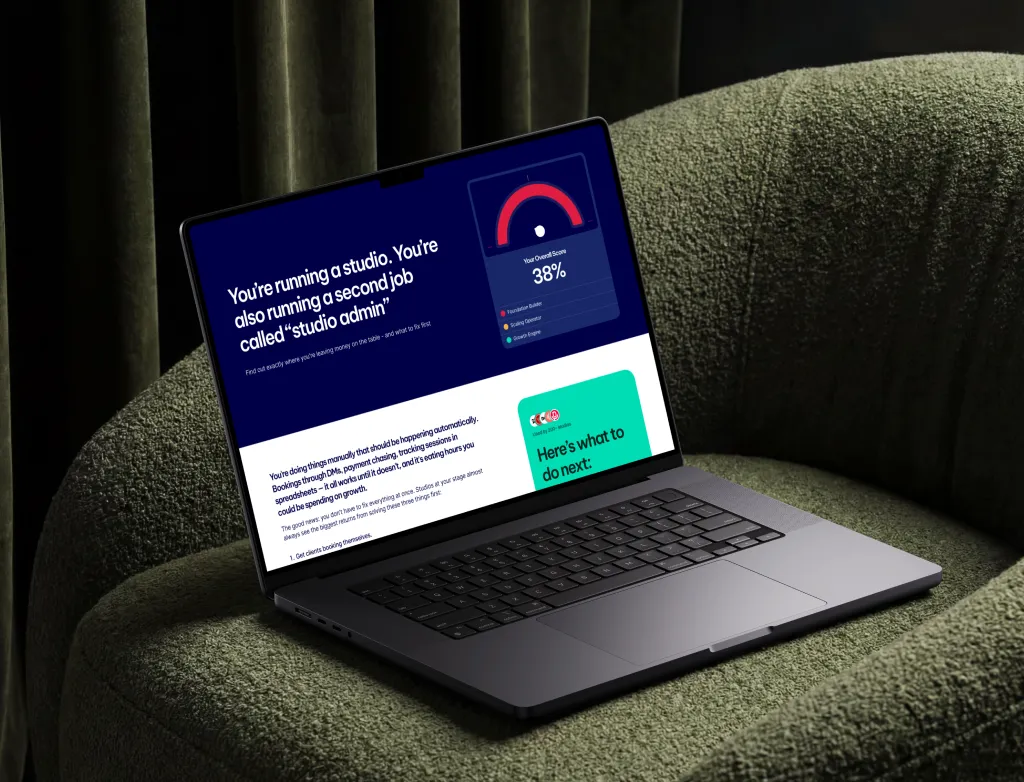
Not sure where your studio stands operationally? The Podyx Studio Maturity Assessment takes five minutes and tells you exactly where your gaps are across operations, tech stack, and client experience. If acoustics are your focus right now, your results will show what else needs attention before you scale. Take the free assessment
If you already know you need better studio management software, the fastest next step is a 20-minute demo. Book a free demo
Prefer to explore on your own first? Start your free trial
.jpg)
.jpg)